This module allows administrator to publish new training to their users for training or inductions.
The administrator may create a new module by following the link under the menu item - management and then selecting online training.
when opening the menu item, a register of existing online training modules previously created will be displayed. The first step is to decide on who will require the new training as it can be published to all Project/Divisions or generic to selected users.

Click on "new training" to start creating your module.
Fill in the Title box and then either decide to keep it open or for selected projects - note that you may always duplicate the training if you wish to publish to others.
Welcome text - this box will be displayed when the user starts. It is good to provide information upfront - why do this training, what is it for and a guide to let them know how long it may take.
Contact page text - here you have the opportunity to insert contact details on who to contact and who would be of assistance when they do the training.
Complete page text - this page will be displayed when the user has completed the training. You may add in some text to welcome them onboard or to congratulate the user in completing the online training. Perhaps some information on their next step would be appropriate here.
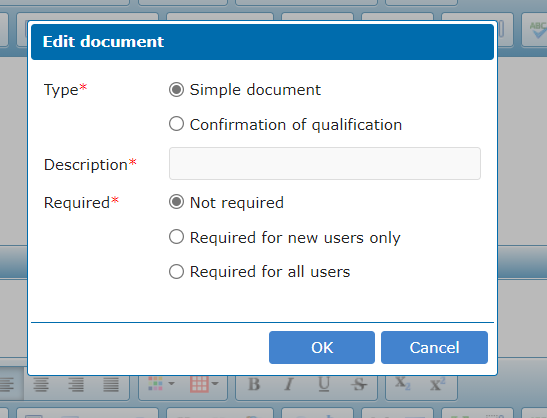
At the bottom of the screen you will find a tick box which is there to allow new users to upload tickets or identification documents. These documents will be uploaded to their profile in the Human resources page.
Add text on what documents will be asked for - choice is simple documents or confirmation of qualifications documents. You may also choose to make these documents as "required" for new users or all users. This is where you decide on what you want from the new user or existing user. Fill in the description so that the user knows what to have ready for upload.
Note that "confirmation of qualifications" documents will require a category, which needs to be set under the Human Resources menu (Settings / new skill) only if it does not exist already.
Save and edit slides - you are now ready to start adding slides, videos, PDF documents, word documents or images.
Each slide has a Title box - information on this slide ca be displayed in the "Slide text" box below. You may also copy and paste text from other documents to make it easier.
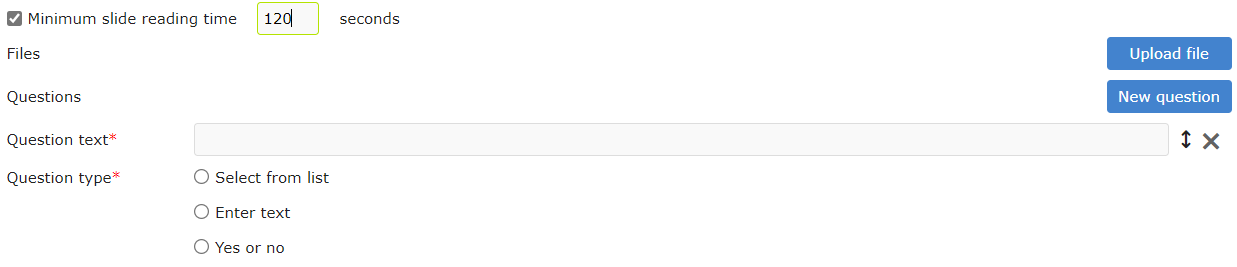
Minimum slide reading time - set this in seconds. 2 minutes will be entered as 120. This forces the user to spend the time reading or watching the video.
Upload files - if you what to add more media to your slide - do this here. Videos, documents, etc. Remember to give your document a description
Questions - if you want to add questions to the slide, you may add them here. First fill in the text box what your question is. Then select how the user should answer the question. The following options are available:
You may add more than 1 question per slide. -Just click on "new question"
Repeat step 6 to 9 until you have covered your training topic.
Publish the online training - On the main page of your training module there are some options.  Described below from left to right.
Play - to play the training module to check correctness
Publish to users - this takes you to the publish page where you may select from your existing users, add new users or add project users. click on one of them and start typing the name, select and this user will be added to the list.
Completion statistics - this icon will show you who has completed the training, when and their score or if they have started the training. You may view more detail on the user by selecting the info icon next to their names (right hand side column) This will also display the questions and their answers.
Edit - this allows admin to edit the training module
Slides - this allows admin to edit the slides associated with this module
Duplicate - this allows admin to duplicate the training module if there is a requirement to publish a similar training module. It is easier than having to start all over again when a similar training module is required for other users.
Delete - this deletes the training module and all statistics connected to it.
